0%
也读bitcask论文有感
todo
kubernetes中的工作队列
简介
今天,我们来看下client-go中的workqueue包的相关队列的实现。
workqueue包下主要实现了3种队列:
- Type队列
- 延迟队列
- 限速队列
并且和我们常规意义上的队列做了功能的增强:
- 公平有序:按照添加顺序处理元素
- 去重:一个元素在被处理前,若添加多次,最终只会被处理一次
- 并发:多生产者和多消费者
- 通知与指标:有关闭通知机制,且提供
Metric指标可与Prometheus对接
Type队列
Interface接口
Type队列实现了Interface接口,并且延迟和限速队列(内嵌类型)也实现了这个接口
1 | type Interface interface { |
Type对象的数据结果
1 | type empty struct{} |
Type对象主要有3个存放队列元素的地方,分别是queue数组,dirty map,processing map。
dirty map用于存放需要被处理的元素,processing map用于存放正在被处理的元素。
一个新元素进入队列,需要调用Type对象的Add()方法,此时,会将元素同时存放在queue数组和dirty map中。
执行Get()方法后,会将元素从queue数组和dirty map删除,放入processing map。
执行Done()方法后,会将元素从processing map中删除.
简单的几个例子
图可能会更好理解一点
- 去重。添加相同元素会被舍弃(如果这个元素还没有被处理)

- 处理时入队,会放入
dirty中(图片太小可以右键在新标签页中打开)
延迟队列
接口定义
1 | type DelayingInterface interface { |
消费channel中的数据
既然会往waitingForAddCh中生产数据,那必然有消费数据的逻辑。waitingLoop是延迟队列的核心。
这里会有一个有序队列waitForPriorityQueue,会将元素进行排序,保证进入最终工作队列的元素是排好队的。
1 | // waitingLoop runs until the workqueue is shutdown and keeps a check on the list of items to be added. |
限速队列
限速队列作用当然是限速。他结合了我们上文提到的各种限速算法。我们先来看下接口定义
接口定义
可以看到,它继承了延迟队列
1 | // RateLimitingInterface is an interface that rate limits items being added to the queue. |
实现
实现就相对比较简洁了,主要调用的是延迟队列和相关限速算法的接口
1 | // rateLimitingType wraps an Interface and provides rateLimited re-enquing |
kubernetes中的限速器
简介
Kubernetes中的client-go包是k8s开发者必须要了解的一块内容,我也认为这是Kubernetes代码的天花板,其中的一些设计思想和实现非常值得我们学习和借鉴。
接下来,我们来看下client-go中的workqueue包的限速器(rate_limiter)的实现。
接口
在workqueue包下的default_rate_limiters.go下有好几种限速器,他们都实现了如下接口:
1 | type RateLimiter interface { |
业务的区分主要在when方法的实现上,可以根据不同的when方法的实现返回不同的延迟时间
实现
我们主要来介绍以下这几钟RateLimiter的实现:
- BucketRateLimiter
- ItemExponentialFailureRateLimiter
- ItemFastSlowRateLimiter
- MaxOfRateLimiter
BucketRateLimiter
主要是官方包rate.Limiter令牌桶的封装,官方包在我的上一篇文章 里有分析,这里不再阐述。
ItemExponentialFailureRateLimiter
该RateLimiter特殊点主要在When函数上,从函数名上可以看出,它是有关指数增长的,这在错误重试、控制器Reconcile的时候非常有用
1 | // ItemExponentialFailureRateLimiter does a simple baseDelay*2^<num-failures> limit |
ItemFastSlowRateLimiter
快慢限速器,可以从实现中看到,当尝试次数小于maxFastAttempts时,when值返回的是fastDelay时间,否则,返回的是slowDelay时间
1 | // ItemFastSlowRateLimiter does a quick retry for a certain number of attempts, then a slow retry after that |
MaxOfRateLimiter
该类型里面以数组的形式存放了多个限速器对象,并且在执行when方法的时候返回延迟最大的那个,其他方法的实现也是类似
1 | type MaxOfRateLimiter struct { |
结语
今天我们看了workqueue包中限速器的几种实现,他们主要在限速队列那边被使用,限速队列会在之后的文章提及。
令牌桶算法与Golang官方包的实现
概念
什么叫令牌桶算法?它有点像疫情期间你去公园玩,为了保证在公园里的人不超过一定的数量,你得在门口大爷那取号子,拿到号子才能进去玩,没号子你就不能进去。当然这例子有点不是太准确,感兴趣的话可以看下维基百科下的解释:https://en.wikipedia.org/wiki/Token_bucket
下面一幅图简单解释了令牌桶的工作流程:
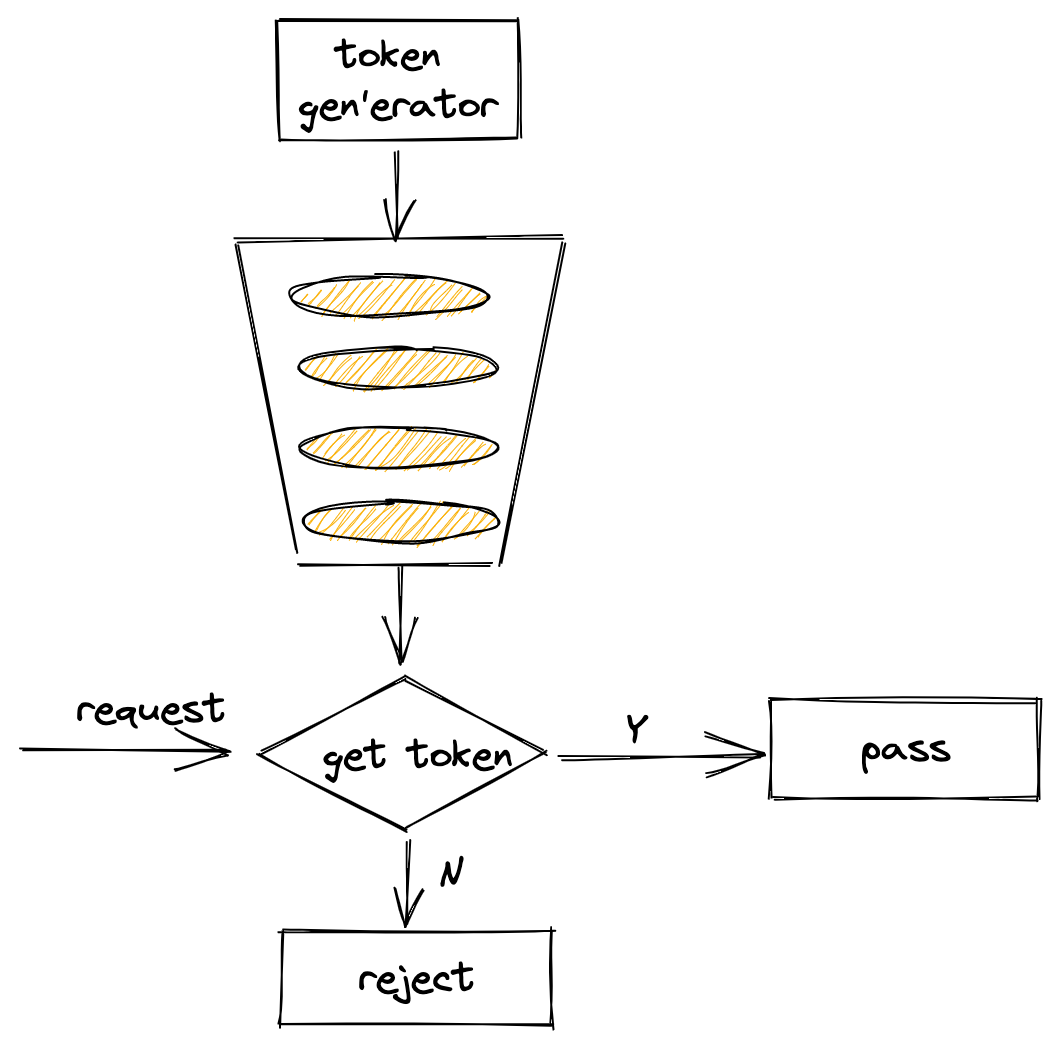
为了统一,下面均将令牌称之为token。
作用
限流。是指限制到达系统的并发请求数,当达到限制条件则可以拒绝请求,可以起到保护下游服务,防止服务过载等作用。
使用
新建限流器方法:
1 | func NewLimiter(r Limit, b int) *Limiter { |
实例化一个限流器:
1 | package main |
上述初始化的意思是:构造了一个容量为50的的桶,并且以每秒10个token的速率往桶里放。
此外,官方还提供了Every方法来设置向桶里放token的时间间隔:
1 | // 每100ms放一个token,也就是每秒10个 |
Limiter主要用到这几个方法:
Wait(ctx context.Context) (err error)WaitN(ctx context.Context, n int) (err error)Allow() boolAllowN(now time.Time, n int) boolReserve() *ReservationReserveN(now time.Time, n int) *Reservation
其中,Wait/Allow/Reserve分别是WaitN(ctx, 1)/AllowN(time.Now(), 1)/ReserveN(time.Now(), 1)的简化形式
WaitN方法代表当桶内的token数量小于N时,则等待一段时间(超时时间可以通过context.withTimeout设置)。如果token数量充足,则从桶中消费掉这N个token,则直接返回。AllowN方法代表截止到某一时刻,判断桶中的token数量至少为N个,如果满足,则从桶中消费掉这N个token,返回true;否则直接返回false。ReserveN方法调用完成后,会返回一个*Reservation对象,你可以继续使用该对象的Delay方法或Cancel方法。
实际使用中,可以根据不同的场景使用不同的方法。比如:AllowN方法可以用在频繁访问场景中,超过一定的速率则直接拒绝访问。
当然你也可以动态调整限流器的速率和桶大小,使用如下方法:
SetLimit(newLimit Limit)SetBurst(newBurst int)
源码分析
官方限流器并没有通过队列来实现桶的逻辑,下面我们通过源码来看一下。
限流器的定义:
1 | type Limiter struct { |
这里有几个字段解释一下:
limit:其实就是float64的别名。它代表token入桶的频率,即每秒可以塞几个token到桶里面。burst:token桶的大小tokens:桶中剩余的token数量last: 上一次取走token的时间lastEvent: 上一次发生限流时间的时间
WaitN、AllowN、ReserveN这三个方法最终都调用了reserveN和advance方法,下面我们来看下这两个方法,我已将主要的注释标注上去了。
1 | func (lim *Limiter) advance(now time.Time) (newNow time.Time, newLast time.Time, newTokens float64) { |
可以看到,advance方法的作用是: 计算出当一个请求进来的时刻,当前可用的token数量,并返回请求时间和上一次token取走的时间
1 | func (lim *Limiter) reserveN(now time.Time, n int, maxFutureReserve time.Duration) Reservation { |
reserveN方法的作用是:判断这个请求能否获得想要数量的token(n),并更新这次请求后Limiter实例的状态。
从上面的分析可以看到,官方的限流器设计还是很精巧的,结合官方库下的测试用例看得话效果更好。(^o^)/~